

Something not working as expected?
We would really appreciate if you could let us know what the issue is! If you want us to get back to you about it, you can leave your email too.
Use custom modals to urge your visitors to get a paid account!
Need help with this MemberScript?
All Memberstack customers can ask for assistance in the 2.0 Slack. Please note that these are not official features and support cannot be guaranteed.
How to Gate Content with Custom Modals in Webflow: A Step-by-Step Guide
Hello there! Are you looking to enhance your website's user experience by gating content with custom modals? You're in the right place! This tutorial will guide you through the process, as demonstrated in the video "How To Gate Content With Custom Modals In Webflow".
What is Gating Content with Modals?
Gating content with modals is a popular feature on many websites. It allows you to show users that certain features exist, but they need to sign up or log in to access them. This is a great way to encourage visitors to upgrade their plan or sign in.
Step-by-Step Guide
Step 1: Understand the Elements
In Webflow, you'll be working with two main elements: a button and a custom modal. The button allows users to interact with your content, and the custom modal pops up when a non-logged-in visitor clicks on a members-only item.
Step 2: Apply Attributes
Apply an attribute to the button: ms-code-gate-modal-trigger. The value for this attribute is a placeholder (for example, "X"). This attribute is crucial for triggering the modal.
Next, apply an attribute to the outer layer of the custom modal: ms-code-gate-modal-box. The value for this attribute should match the value you used for the button attribute (in this case, "X"). This attribute is essential for linking the button to the correct modal.
Step 3: Customize Your Modal
You can customize the content of your modal to suit your needs. For example, you can include links to a sign-up page or any other relevant information.
Step 4: Hide Your Modal
Before you publish your website, make sure to hide your modal. Also, note that the script sets the modal to flex, which is a common practice for centering everything inside the modal.
Step 5: Implement Memberscript 26
Paste in Memberscript 26 into your Webflow project. You don't need to change anything here unless you're using a different display property (like block instead of flex).
Step 6: Adjust for Links
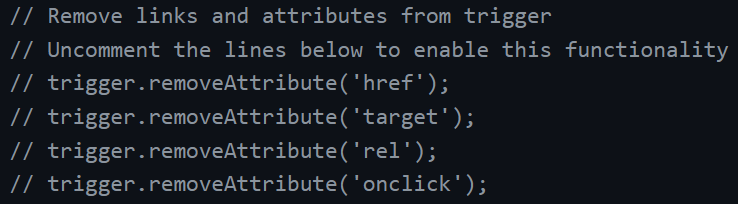
If your button links to another page, you'll need to adjust the script to prevent the link from interfering with the modal. You can do this by uncommenting certain lines in the script.
Step 7: Remove Unwanted Attributes
If you have custom attributes that you want to remove, you can do so by copying and pasting a specific line of code from the script.
And that's it! You've successfully gated content with custom modals in Webflow.
Conclusion
Gating content with custom modals is a powerful way to enhance your website's user experience. With just one script and two attributes, you can create a more engaging and personalized experience for your visitors. If you encounter any issues, don't hesitate to reach out for help. Happy coding!
For more detailed instructions, you can watch the full video tutorial here.
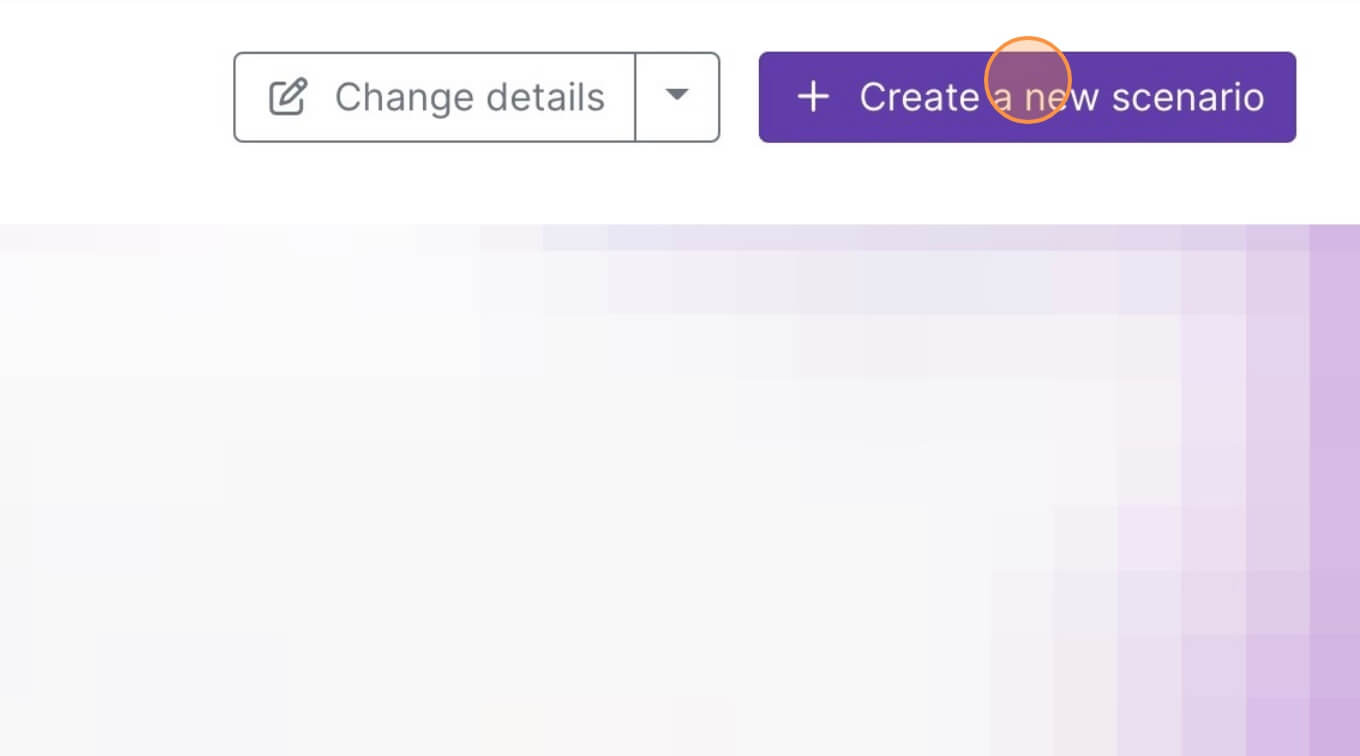
Creating the Make.com Scenario
1. Download the JSON blueprint below to get stated.
2. Navigate to Make.com and Create a New Scenario...
3. Click the small box with 3 dots and then Import Blueprint...
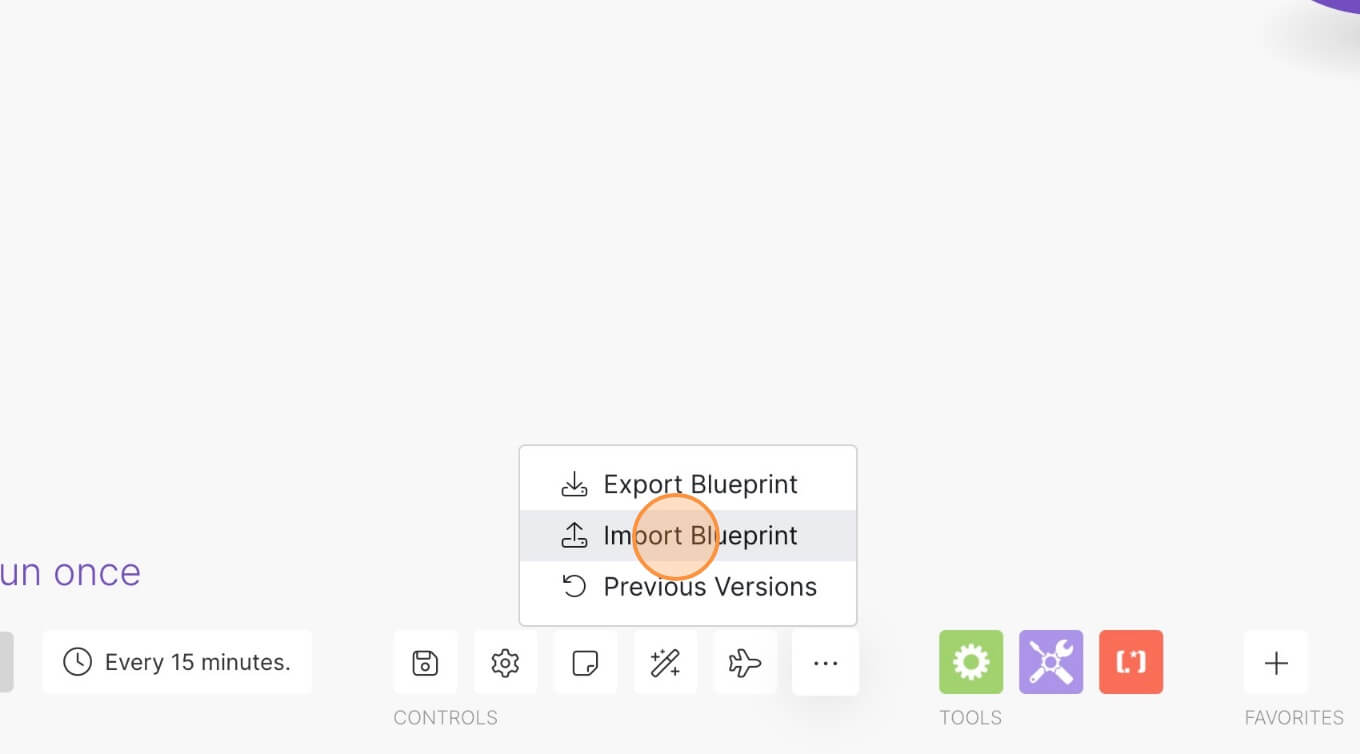
4. Upload your file and voila! You're ready to link your own accounts.
How to Build Paywalls with Webflow
Memberscripts needed
#26 - Gate Content With Custom Modals
Tutorial
Cloneable
https://webflow.com/made-in-webflow/website/open-modal-click-not-loggedin
Why/When would need to Build Paywalls?
- Restrict functionalities only meant for logged in users.
- Put premium content behind a paywall.
Many websites nowadays do something called gating content, sometimes even putting content behind a paywall.
What this means is that users can see that a certain piece of content or a feature exists, but once they try to see or use it, they’ll be informed that they need to perform an action before they can access it. This typically involves signing up for an account, paying, or both.
Today we’ll look at how you can implement this functionality into your own Webflow site using Memberstack.
How to gate content on Webflow
To be able to gate content, we’re going to use MemberScript #26 – Gate Content With Custom Modals. Follow the link to get the code you’ll need to add to your page and watch a video tutorial on how to set everything up.
Setting everything up
First, you need to decide what exactly on your page you want to gate from users. In our example, we’re going to assume you’ve got a Like/Unlike functionality on your page which is restricted to users who are logged in.
Go ahead and build a pop-up modal that informs users that they need to be logged in to like or unlike content on your site.
Next up, select the like/unlike buttons on your page and add the following attribute:
- ms-code-gate-modal-trigger=”x”
Once that’s done, select your modal and add this attribute:
- ms-code-gate-modal-box=”x”
We’re using “x” as a value just to match the trigger to the pop-up modal, so it can be whatever you want. For our purpose, it could be “like”. If you add another pop-up modal to your site with a different type of trigger, you can link them using a different value for the attributes.
This allows you to use as many triggers and modals on a site as you like without mixing them up, while also being able to customize your pop-up modals to reflect the different types of triggers (e.g. Like/Unlike, message a user, download gated content, etc.).
Making it work
Now that you’ve got the form set up, all you need to do is add the MemberScript #26 custom code to your page, before the closing body tag.
There are two things you might want to change in the custom code:
- the modal’s display style – by default it’s set to flex, but if you’ve styled it in a different way, you can just replace flex with block, for example.
- uncomment certain lines – you’ll see at the end of the custom code there are some lines meant to remove certain attributes from the trigger, depending on what the trigger does. For example, if the trigger opens a link to content that you want gated, you’ll need to uncomment the line that removes the href attribute. To do this, simply remove the two forward slashes from the beginning of the line.
Before publishing the page, don’t forget to set your pop-up modal to hidden, so they only appear when needed.
Conclusion
That’s everything, you can now go ahead and test out your pop-up modal for users who aren’t logged in.
If you want to use our demo project to get you started, just click the button below to add it to your Webflow site.
Our demo can help you gate content or features with custom modals using a very simple, attribute-based solution.


.png)
