Key Benefits
Steady Revenue Stream
Reliable and steady revenue stream for your business. Offer monthly or yearly subscription fees, giving you a consistent flow of income.
Exclusive Access
Give your customers access to exclusive content and features that are not available to free members. Things like premium content, early access to new products or services, and member-only discounts and promotions.
Upsell Opportunities
Opportunity to upsell your customers to higher-priced products or services. Offer a basic membership tier with limited features and benefits, you can entice customers to upgrade to a more expensive membership level for additional perks and benefits.
How to create Paid Memberships
If your site has all free members or a mix of free and paid check out those articles too!

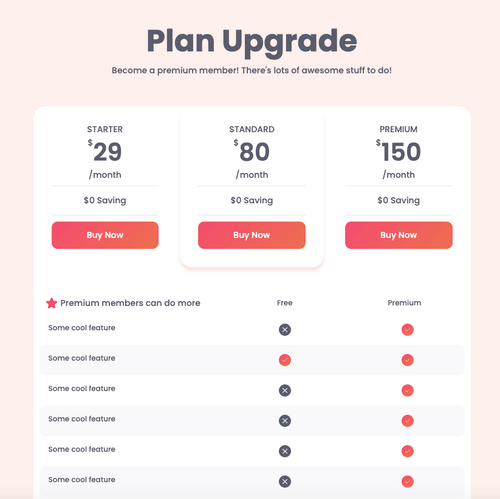
Plan Settings and Pricing Tables
Create paid plans and hook them into a pricing table. We're going to run through how, skip ahead if you've already finished a step.
Install Memberstack
1. First, install Memberstack into your project.
Create a Signup Form
2. Create a signup form so members are able to sign up and launch the checkout. Note: Members must have an account before they're able to purchase a price.
Create a Plan
3. Watch this short video to create a paid plan in your Memberstack dashboard. You'll want to create a plan for each type of content on your site (Basic, Premium, etc,) and then create prices for each pricing option available to customers (Basic Monthly, Basic Yearly, etc.).
Create a Pricing Table
4. And finally, you need to create or copy a pricing table, link your signup buttons to your signup page, and add your Memberstack data attributes. The video below will explain how.
Use the attribute data-ms-price:update="PRICE_ID" to allow members to switch between prices. For example, to upgrade from a basic price to a premium price.
Use the attribute data-ms-plan:add="PRICE_ID" to allow members to have multiple prices. This is great for one-time payments, courses, digital products, and a-la-carte services.
Handle Abandoned Checkouts
In order for a member to complete checkout, they must first have an account. So it's entirely possible that members will signup → leave the checkout → and then return to checkout in the future.
In order to help these people get back to the checkout in the future you should do the following:
1. First, you'll want to set your default signup and login redirects to point to a pricing page. Anytime some signs up or logs in without a plan Memberstack will redirect them to your pricing page. The first 1-minute video on this page will show you how.
2. Next, you'll want to add this element to your signup page. It will appear for members who are logged in and don't have any plans yet. I recommend linking the message to your pricing page.

Handle Failed Payments & Cancellations
If someone cancels their plan or fails to make a payment their plan will no longer be active. Which means they will lose access to their paid plan's gated content & permissions.
You can use Plan Logic to automatically add the member to a free plan or you can let treat them like a member with "no plans."
It's important that members maintain access to their profiles. You can adjust your gated content so that the profile settings pages are accessible to all members (regardless of their plan or plan status.
You can do that by gating access to your profile pages and grant access to "All Members". This will make them accessible to anyone with an account.